Creating a Talking Image Video for Faceless YouTube has become a reliable method for building YouTube channels without ever appearing on camera. Instead of recording yourself, you can take a static image and transform it into a speaking, expressive video using AI technology.
In 2026, this method is widely used for storytelling channels, educational videos, news-style content, and various niche topics where consistency and production speed matter more than personal appearance. It allows creators to produce high-quality videos while maintaining complete anonymity.
With tools like Zoice, converting an image into a talking video is now a structured and repeatable process. By combining an image, a voice, and a script, you can consistently generate engaging faceless YouTube videos at scale.
Why Use Talking Image Video For Faceless YouTube?
Talking image videos eliminate the need to appear on camera, making them ideal for creators who want to stay anonymous or focus purely on content creation.
They also make content production highly scalable. Once your avatar is created, you can reuse it across multiple videos by simply updating the script or voice, which significantly reduces production time.
Another major advantage is consistency. Your avatar maintains the same appearance, tone, and presentation style across all videos, helping you build a recognizable identity and brand on YouTube.
Steps to Create Talking Image Video For Faceless YouTube Using Zoice
Before you begin, it’s important to understand that Zoice follows a structured workflow where avatar creation, voice setup, and video generation are handled separately. This ensures better control, higher quality output, and consistent results across all your videos.
Step 1 – Log into Zoice Dashboard
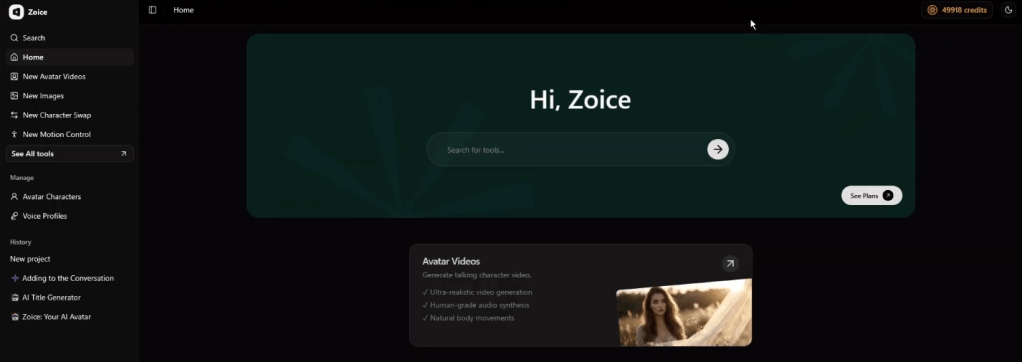
Start by logging into your Zoice account. Once inside the dashboard, you’ll have access to all the core features required to create avatars, set up voice profiles, and generate videos. Take a moment to familiarize yourself with the layout, especially the sidebar navigation.
Step 2 – Go to Avatar Characters

From the left sidebar, click on Avatar Characters. This section allows you to manage all your existing avatars and create new ones based on uploaded images.
Step 3 – Click on Create New

Select the Create New option to begin building a new talking image avatar. This will open the setup interface where you can upload and configure your image.
Step 4 – Upload a Clear Image

Choose the Upload Image option and add a high-quality, front-facing photo. For best results, use an image with good lighting, a neutral background, and a clear view of the face, as this helps the AI generate more accurate facial movements.
Step 5 – Assign a Name to Your Avatar

Give your avatar a unique and recognizable name. This is especially helpful if you plan to create multiple avatars for different channels or content types.
Step 6 – Generate the Avatar
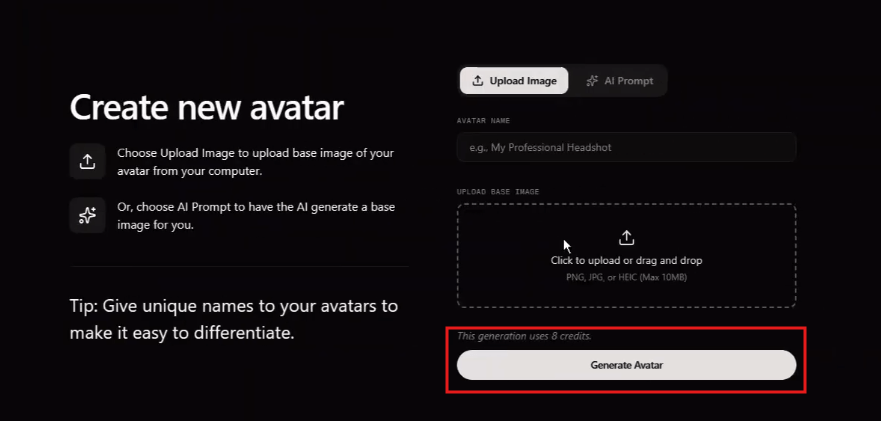
Click on Generate Avatar and allow Zoice to process your image. The platform will map facial features and prepare the avatar for animation, enabling it to sync with voice and expressions later.
Step 7 – Navigate to Voice Profiles

Once your avatar is ready, go to the Voice Profiles section from the sidebar. This is where you define the voice that will be used in your videos.
Step 8 – Upload or Create Voice
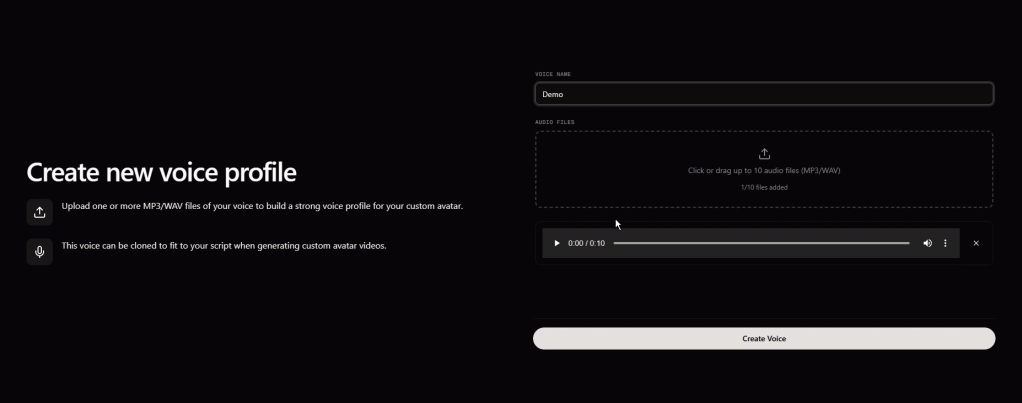
You can either upload a voice sample for cloning or select from available AI-generated voices. After choosing your preferred option, assign a name and click Create Voice to save it as a reusable profile.
Step 9 – Open New Avatar Videos
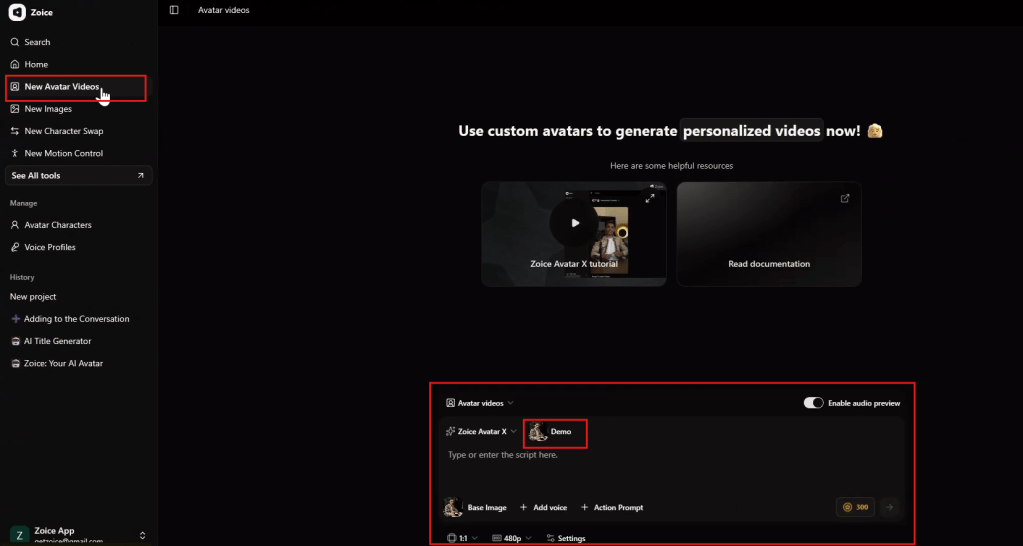
Next, navigate to New Avatar Videos. This is where you combine your avatar and voice to create a complete talking video.
Step 10 – Add Script and Adjust Reactions
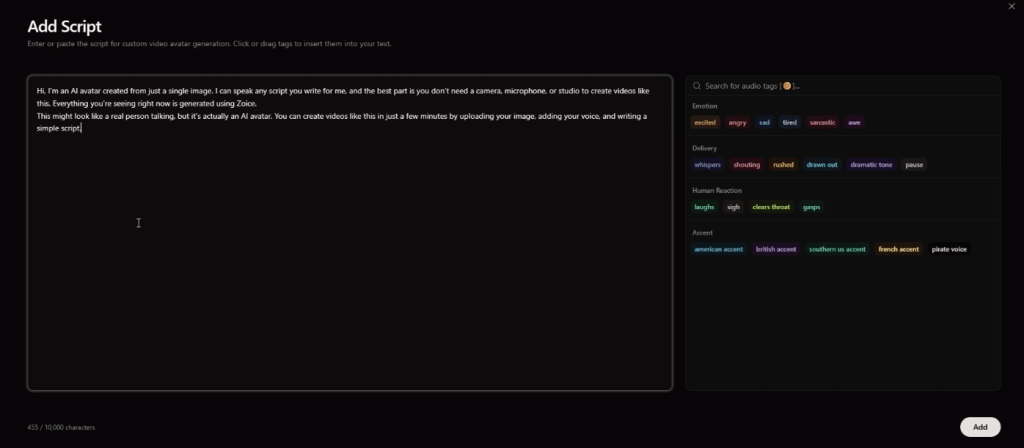
Enter your script in the text field. You can also adjust emotional tones or reaction settings to make the avatar appear more expressive and aligned with the content.
Step 11 – Select Voice Profile
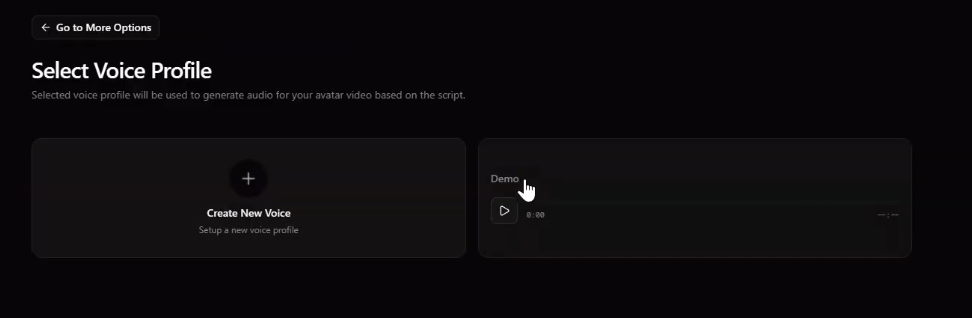
Choose the voice profile you created earlier. This ensures that all your videos maintain a consistent tone, accent, and delivery style.
Step 12 – Configure Video Settings

Set your video preferences, including resolution, dimensions, format, and pixel quality. For YouTube, a 16:9 aspect ratio is recommended to ensure proper display and optimization.
Step 13 – Generate Final Video
Click Generate to create your final video. Zoice will process your inputs and produce a fully synchronized video with voice, facial animation, and expressions ready for publishing.
Conclusion
Creating a Talking Image Video for Faceless YouTube in 2026 is one of the most efficient ways to build and scale a content channel without appearing on camera.
By combining a static image, a voice profile, and a well-written script, you can produce engaging and consistent videos that maintain a professional look across all uploads.
Zoice provides a structured and reliable system that simplifies this entire workflow, making it an ideal solution for creators focused on faceless YouTube growth.
FAQs
What is a talking image video for faceless YouTube?
It is a static image that is converted into a speaking video using AI, allowing creators to produce content without showing their face.
How do I create a talking image video?
You can upload an image, generate or select a voice, add a script, and create a video using platforms like Zoice.
What type of image works best?
High-quality, front-facing images with good lighting and clear facial visibility produce the best results.
Can I monetize these types of videos on YouTube?
Yes, many creators successfully monetize faceless AI-generated videos, as long as the content follows YouTube’s guidelines and provides value.
Why should I use Zoice for talking image videos?
Zoice offers advanced facial animation, voice customization, and a structured workflow that makes it easy to create and scale faceless video content.


Leave a Reply